Grasp of Avarice Master Boosting
Buy Grasp Of Avarice master Boost and you will get new weapons, Thorn armor set, and a Gjallarhorn with additional options.
What you will get
- The Grasp Of Avarice Master Boost Completion
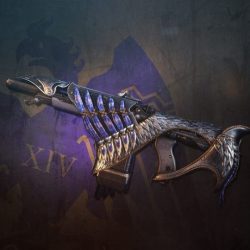
- Dungeon Master last boss loot – guaranteed:the chance to get:Matador 64 Shotgun, Eyasluna hand cannon, 1000 Yard Stare sniper rifle and more
- Corrupting Echo Armor Pieces with extra mod slots.;
- Bonus experience for your seasonal artifact, power lvl, and season pass level;
Jump into Destiny 2’s Bungie 30th Anniversary Master dungeon for some classic Bungie weapons
The Grasp of Avarice is the fourth dungeon in Destiny 2 and is included in Bungie’s 30th Anniversary Pack. This pirate-themed adventure is chock-full of Bungie memorabilia, including fan-favorite original Destiny weaponry like Eyasluna and more historical Bungie memorabilia like the Claymore from Myth.
We’ll show you how to explore the depths of the treasure cave in this fast and simple lesson so you may emerge triumphant with an inventory full of goodies.
If you haven’t already completed Grasp of Avarice, be sure to do Xur’s “And Out Fly The Wolves” quest to get the Gjallarhorn Exotic rocket launcher.

__
Grasp of Avarice Master recovery
Fireteam: Up to 3 Players
Location: Cosmodrome
The Cosmodrome is your first stop after entering the Grasp of Avarice. If you go onward, you’ll see several foes gathering around the famed Destiny loot cave – it’s simply the little tunnel in the side of the wall if you’re unfamiliar. Kill every opponent that appears outside the treasure cave (enemies won’t spawn if you’re too near).
Enemies will drop Exotic-looking Engrams with gold and red flashing lights. Burdened by Riches is the dungeon’s most important mechanic, and here is your first exposure to it.


Grasp of Avarice Master boosting and carry
The Return of Gjallarhorn carry
You’ll get a Burdened by Riches debuff if you run over one of these Engrams. It only lasts 25 seconds and will kill you if you don’t get rid of it in that time. By picking up additional Engrams, you may stack this debuff, and each new layer resets the duration. But you’ll have to get rid of them sooner or later. This is when the crystals enter the picture.
A little white crystal may be found within the cave. If you stand adjacent to the crystal while wearing Burdened by Riches, the crystal will drain two stacks of the debuff from you. The crystal will literally expand as you add additional stacks to it. When it has grown large enough, a hole will appear in the treasure cave’s floor, and you will tumble into the Master dungeon.
Grasp of Avarice Master carries
Normally, dungeons in Destiny 2 are rather simple, and we just need to discuss the encounters. The Grasp of Avarice, on the other hand, has a unique beginning that deserves its own section. There are booby traps around since you’re attempting to break into a pirate hideout.
Here’s how to go to the first encounter while avoiding the booby traps.
In Destiny 2, Guardians fight their way through the Master dungeon Grasp of Avarice.
Take the second right-hand door. Bungie courtesy of Polygon
In the Rusted Gangplank section, take the second door on the right. (The first is going to kill you.)
If you don’t jump over the pressure plate in the floor, you’ll die as well.
On the terminal, pull the lever.
In the Rusted Gangplank section, don’t pull the switch at the end of the walkway. (You’ll be sent into space.)
Grasp of Avarice Master carries and boost
- Enter the newly opened pipe.
- Jump forward onto the platforms suspended in the middle of the room. If you stand on them too long you’ll plummet to your death. Don’t jump to the terminal across the way either — it’s another spike trap. Instead …
- Let yourself fall through the trap doors and fall strategically into the secret room on the right.
- Pull the lever, and make your way back to the room with the two doors.
:no_upscale()/cdn.vox-cdn.com/uploads/chorus_asset/file/23072485/Destiny_2_Screenshot_2021.12.07___18.44.35.84.png)
Climb the fixtures up to the pipes
Image: Bungie via Polygon
Climb the wall fixtures on your right and keep climbing into the sky.
:no_upscale()/cdn.vox-cdn.com/uploads/chorus_asset/file/23072486/Destiny_2_Screenshot_2021.12.07___18.44.46.19.png)
Take the farthest right pipe
Image: Bungie via Polygon
There will be six pipes in front of you. Enter the third pipe on the right. You should see sunlight coming in from the grate above you. Step on the pressure pad to open the grate. Jump up.
:no_upscale()/cdn.vox-cdn.com/uploads/chorus_asset/file/23072487/Destiny_2_Screenshot_2021.12.07___18.45.16.11.png)
Climb the fixtures, but watch out for the spike trap on the left
Image: Bungie via Polygon
Climb the fixtures in front of you, careful to avoid the pressure plate on the left, which is a spike trap.
:no_upscale()/cdn.vox-cdn.com/uploads/chorus_asset/file/23072488/Destiny_2_Screenshot_2021.12.07___18.45.29.33.png)
Shift which doors are open to get across the reservoir
Image: Bungie via Polygon
- Follow the path until you reach another switch. There’s a diagram here that shows doors open and closed. Pay attention to the board.
- Open the switch and move to the next room across the way.
- Turn the switch, zig-zag to the next room where you recently opened a door, and repeat until you reach the third switch room on the left.
- Then jump up and hit another Switch, opening the large doors on the side. Be careful, as these rooms are dark and full of traps.
:no_upscale()/cdn.vox-cdn.com/uploads/chorus_asset/file/23072489/Destiny_2_Screenshot_2021.12.07___18.46.33.51.png)
Open both of the big doors to proceed
Image: Bungie via Polygon
With the first big door open, backtrack to the first switch and defeat the enemies behind the newly opened big door.
Hit the switch here to open another big door across the way.
:no_upscale()/cdn.vox-cdn.com/uploads/chorus_asset/file/23072490/Destiny_2_Screenshot_2021.12.07___18.48.21.65.png)
Image: Bungie via Polygon
There will be two doors in this next area. Take the one that leads forward and ignore the one on the left.
Congratulations, you’ve avoided most of the traps in this Master dungeon.
THE SCORCH CANNON Grasp of avarice account recovery and carry
:no_upscale()/cdn.vox-cdn.com/uploads/chorus_asset/file/23072491/Destiny_2_Screenshot_2021.12.07___18.50.05.31.png)
Image: Bungie via Polygon
This is a very fast section that barely counts as an encounter, but it teaches you one of the dungeon’s other big mechanics: Scorch Cannons.
- Jump into the giant cylinder and go to the panel near the door marked one.
- Throw the switch to open door three.
- Go into three, defeat the enemies, and throw the switch there. The switch in three will open up door one, which is filled with enemies.
- Kill them and throw the switch, opening up door two.
Door two holds a Scorch Cannon.
- Have someone with good aim grab it, and move to door number four.
- Aim the Scorch Cannon at the energy box next to door four, specifically the cylinder in the middle.
- Shoot the Scorch Cannon at the cylinder three or four times, or shoot it once and then hold the trigger until the shot fully charges.
When you fully power the device, the door will open and the barricade will drop.
Move up the stairs and jump into one of the crevices so you don’t get crushed by a barrel.
Break the vent in the next room to put yourself on the path to the first boss encounter.
PHRY’ZHIA THE INSATIABLE
:no_upscale()/cdn.vox-cdn.com/uploads/chorus_asset/file/23072493/vlcsnap_2021_12_08_02h07m39s771.png)
Phry’zhia is the dungeon’s first real encounter and is very easy. He’s here to make sure you know how the mechanics work in this dungeon.
The arena is broken into two sides: right and left. Each side has locked doors hooked up to energy devices. There’s a Scorch Cannon Vandal in the back of the arena and a crystal in the front.
Kill the enemies and have someone grab the Scorch Cannon. Open the right side doors to reveal a host of enemies. Kill them, pick up their Engrams, and quickly run to the crystal at the front of the room. Deposit your debuffs.
Now open the left side and repeat the process.
Once you’ve grown the crystal enough, it will lower Phry’zhia’s shield. Hide behind the Crystal — or use a Well of Radiance — to stay alive and beat Phry’zhia down with rockets, fusion rifles, linear fusion rifle shots, or even swords.
If you don’t kill Phry’zhia after a certain amount of time, his shield will come back and you’ll need to repeat all of this again.
Once you’ve killed him, go through the door in the back and turn left.
THE SPARROW BOMB DEFUSAL
:no_upscale()/cdn.vox-cdn.com/uploads/chorus_asset/file/23072495/Destiny_2_Screenshot_2021.12.07___19.04.35.33.png)
After running for a bit, you’ll come across a big door that leads to an even bigger space. Pull the left switch (not the right, which is a trap) and hop on your Sparrow.
At the end of the area, you’ll see a mine counting down. You need to reach this mine and stay in its area for about a full second to defuse it. If it goes off, you die. You’ll need to repeat this three more times, for four mines total.
Each mine only gives you 15 seconds, but you can extend the timers briefly by running your sparrow near some switches.
:no_upscale()/cdn.vox-cdn.com/uploads/chorus_asset/file/23072496/Destiny_2_Screenshot_2021.12.07___19.04.40.47.png)
Mine A has a switch on the right near some trees.
:no_upscale()/cdn.vox-cdn.com/uploads/chorus_asset/file/23072497/Destiny_2_Screenshot_2021.12.07___19.04.45.94.png)
And another switch on the left overlooking a bluff.
:no_upscale()/cdn.vox-cdn.com/uploads/chorus_asset/file/23072498/Destiny_2_Screenshot_2021.12.07___19.04.59.81.png)
Mine B has a switch on the right of the little tunnel.
:no_upscale()/cdn.vox-cdn.com/uploads/chorus_asset/file/23072494/vlcsnap_2021_12_08_01h27m14s027.png)
And another switch on the left ramp.
:no_upscale()/cdn.vox-cdn.com/uploads/chorus_asset/file/23072499/Destiny_2_Screenshot_2021.12.07___19.05.14.24.png)
Mine C has a switch just through the metal ramp
:no_upscale()/cdn.vox-cdn.com/uploads/chorus_asset/file/23072500/Destiny_2_Screenshot_2021.12.07___19.05.22.96.png)
And another switch at the end of the tunnel on the left.
:no_upscale()/cdn.vox-cdn.com/uploads/chorus_asset/file/23072501/Destiny_2_Screenshot_2021.12.07___19.05.32.57.png)
Mine D has a switch on the rock ramp on the right.
:no_upscale()/cdn.vox-cdn.com/uploads/chorus_asset/file/23072503/Destiny_2_Screenshot_2021.12.07___19.05.43.71.png)
And another switch in the right eye socket of the skull (your left), which you can get to by taking the cannon on the left.
When you defuse Mine D, you’ll finish the encounter.
THE CANNONS
:no_upscale()/cdn.vox-cdn.com/uploads/chorus_asset/file/23072504/Destiny_2_Screenshot_2021.12.07___19.08.14.62.png)
This encounter takes place in a giant lagoon. You’ll see a kind of mechanical metal hot air balloon stuck into the cave’s ceiling, with orange nodes around the sides. There are multiple platforms in each of these areas, and each platform has its own cannon (which you can move in multiple directions) and a Scorch Cannon Vandal.
Steal a Scorch Cannon and use it to activate the energy device connected to the cannon and jump your way onto one of the platforms. To launch yourself and your friends, make sure everyone who wants to fly is under the cannon before you shoot the power supply. If you’re trying to launch yourself, you’ll need to shoot the Scorch Cannon onto the power device, hold the trigger so it doesn’t blow up, move yourself under the cannon, and let go of the trigger.
You’re looking for what we’re going to call an “active” platform, meaning there are enemies on it — more specifically, you’re looking for a shielded Servitor called an “Abundance Monitor.” When you find the Servitor, angle the cannons and jump your way to the Servitor’s platform — this may take multiple jumps, depending on where you’re going.
Clear the active platform of enemies, and pick up their Engrams when they die. Deposit them in the crystal in the platform’s center room. When you’ve done it enough, the crystal will grow and break the Servitor’s shield. Kill the Servitor.
:no_upscale()/cdn.vox-cdn.com/uploads/chorus_asset/file/23072506/Destiny_2_Screenshot_2021.12.07___19.14.02.78.png)
Instead of dying like normal, the Servitor will turn into a rolling cannonball. Walk up to the Servitor, and use your body to push it toward that platform’s cannon — be careful not to dump the bomb into the lagoon below. Once the cannonball is in place, rotate the cannon so it’s facing the orange node on the hot air balloon. With everything ready, use the Scorch Cannon to activate the cannon, launching the cannonball into the node.
If done correctly, you’ll take off a fourth of the “Fallen Shield” health bar. Repeat three more times to finish the encounter. Then ride the final cannon in the middle of the lagoon up to the final boss.
CAPTAIN AVAROKK THE COVETOUS
:no_upscale()/cdn.vox-cdn.com/uploads/chorus_asset/file/23072507/Destiny_2_Screenshot_2021.12.07___19.24.10.93.png)
Captain Avarokk is the final boss of the Grasp of Avarice dungeon, and like the previous boss, he’s not too tough.
This room is broken up into four sections: three enemy platforms with chests hanging off the wall, and the ship/stage in the middle. Captain Avarokk will spend all their time on the stage while you and your buddies will hang on the enemy platforms.
KILL R-M80 AND GRISPRAX
The first thing you need to do in this fight is kill Captain Avarokk’s two minions. There’s the Shank, R-M80 (read that out loud if you don’t get the ☠️ joke) and the stealth Vandal, Grisprax. These enemies have tons of health and will kill you very quickly if you get too close to their Captain.
R-M80 doesn’t drop any Engrams when you kill it, but Grisprax drops 10 Engrams. When it dies, jump on the stage, grab the Engrams, and deposit your debuff into the crystal in the center of the room — be very careful of the boss and use the crystal to shield yourself.
SCORCH VANDAL, POWER SUPPLIES, AND THE SCORCH CANNON
With those Engrams deposited, kill the Scorch Vandal somewhere in the room and grab their weapon. There are three power supplies — the things you’ve been shooting with the Scorch Cannon — attached to the stage rigging. Have each of your friends take a different enemy platform and then fire the Scorch Cannon into the power supply until it’s fully charged. This will cause hammers on the walls to slam into the hanging chests, raining Engrams down.
:no_upscale()/cdn.vox-cdn.com/uploads/chorus_asset/file/23072508/Destiny_2_Screenshot_2021.12.07___19.24.20.72.png)
DUMP ENGRAMS, GROW THE CRYSTAL master goa carry and recovery
If you’ve done this correctly, you should have 30 total Engrams split among you. Drop them all in the crystal, and then repeat. Including the Engrams from Grisprax, it took two rounds of dumping 30 Engrams to grow the crystal. There is some wiggle room, however, and after running the dungeon multiple times, we’re fairly certain you only need 60 engrams to grow it, not the full 70.
KILL CAPTAIN AVAROKK master goa boost and boosting
Once the crystal is up, the boss will teleport to the back of the room and just kind of stand there. Captain Avarokk will lose their shield, and you can shoot them from the crystal (we recommend similar weapons to Phry’zhia).
Like the first boss, you only have so long before Captain Avarokk’s shield comes back. If you don’t kill them after the first phase, you’ll need to repeat all of the above again.
Once Captain Avarokk is dead, the big chest in the back will swing open, and you’ll be able to collect your booty. And if this is your first time through, you’ll be well on your way to the Gjallarhorn Exotic rocket launcher.



Reviews
There are no reviews yet.